Showing posts with label dessert. Show all posts

Wednesday, January 8, 2014

Top 5 Delicious Recipes from 2013

Top 5 Delicious Recipes from 2013

2013 was a great year of many many changes for our family! We've been crazily busy with two new babies and our first baby turning one. I started this blog in May so it wasn't around the entire year, but here are the top 5 recipes I've posted that you all have loved the most:

1. Parmesan Roasted Green Beans
Parmesan Roasted Green Beans

2. The Best Pumpkin Bread Ever
The Best Pumpkin Bread Ever

3. Snickerdoodle Bars
Snickerdoodle Bars

4. M&M Cookie Bars
Delicious M&M Cookie Bars

5. Tater Tot Taco Bake
Tater Tot Taco Bake

So if you haven't seen these yet, check them out! You might want to try them, they are all very yummy and your family will love them! I can't wait to keep trying new recipes in this new year!


Did you enjoy this post? Follow me on PINTEREST, FACEBOOK, TWITTER,
INSTAGRAM and on BLOGLOVIN' to stay updated!

(Parties I link to HERE)

Monday, October 7, 2013

Apple Cheesecake Crumble Bars

Apple Cheesecake Crumble Bars

How does the weekend go so fast? Or the entire week for that matter! It feels like I can never keep up with everything. I've been slacking on posting lately, but today I have this super delicious dessert. (Again with the desserts!) In case you can't tell, we have an awful lot of desserts around our house all the time. I love baking and trying new things and figuring out what works and what doesn't! 

Today I've been making a yummy corn chowder in the crock pot all day. It's going to be fantastic when we have it for dinner tonight. I'll post the recipe next week, because I know you all will want to try it! Okay, here's the recipe for my Apple Cheesecake Crumble Bars.

Apple Cheesecake Crumble Bars
(adapted from The Girl Who Ate Everything)
Crust:
  • 2 cups of Flour
  • 1/2 cup packed Brown Sugar
  • 1 cup (2 sticks) Butter, softened
Cheesecake Filling:
  • 2 packages Cream Cheese, softened
  • 1/2 cup Sugar
  • 2 Eggs
  • 1 teaspoon Vanilla Extract
Apples:
  • 3 Granny Smith Apples, peeled, cored and finely chopped
  • 2 Tablespoons of Sugar
  • 1/2 teaspoon Ground Cinnamon
  • 1/4 teaspoon Ground Nutmeg
Crumble Topping:
  • 1 cup packed Brown Sugar
  • 1 cup Flour
  • 1/2 cup Quick Cook Oats
  • 1/2 cup (1 stick) Butter, softened

Directions:
1. Preheat oven to 350 degrees. Lightly spray a 9x13 baking pan with non-stick cooking spray.
2. In a medium bowl, combine flour and brown sugar. Cut in butter until mixture is crumbly. Press evenly into the bottom of the pan. Bake 15 minutes or until lightly browned.
3. In a large bowl, beat cream cheese with 1/2 cup sugar until smooth. Add eggs and vanilla. Stir to combine and pour over the warm crust.
4. In a small bowl, stir together chopped apples, 2 Tablespoons of sugar, cinnamon and nutmeg. Spoon evenly over cream cheese mixture.
5. For the crumble topping: In a small bowl combine all ingredients and sprinkle over apples.
6. Bake 40-45 minutes or until filling is set. Let cool before serving. Serve cold. 


Did you enjoy this post? Follow me on PINTEREST, FACEBOOK, TWITTER,
INSTAGRAM and on BLOGLOVIN' to stay updated!

(Parties I link to HERE)

Monday, September 23, 2013

Mint Chocolate Brownies

Mint Chocolate Brownies

Today I have another dessert to share with you. These Mint Chocolate Brownies are one of my favorite bars that I've made. I love mint chocolate anything! It's actually very similar to the Marble Cheesecake Brownies, except it's even easier to make because it uses a box brownie mix. 

It has been kind of a long night waking up with all three boys. I need to start some coffee! I have promised myself that I would be better about posting this week, since last week was kind of a lazy week as far as that goes. So here's to a more productive week! 

Mint Chocolate Brownies (adapted from Confessions of a Cookbook Queen)
  • 1 box Family Size Chewy Brownie Mix
  • Eggs, Oil and Water needed to prepare the mix
  • 8 ounces Cream Cheese, room temperature
  • 2 Eggs
  • 1 Tablespoon Peppermint Extract
  • 1/3 Cup Sugar
  • Green Food Coloring
1. Preheat oven to 350 degrees. Lightly spray a 9x13 inch baking pan with non-stick spray.

2. In a large bowl, prepare the brownie mix according to the package and spread about 3/4 of the mixture into the bottom of the pan.

3. Mix the cream cheese, eggs, sugar and peppermint extract together in another bowl until smooth. Add some green food coloring.

4. Spoon the cream cheese mixture over the brownies. Spoon the remaining brownie mix on top of the cream cheese mixture randomly. With a knife, swirl the cream cheese and the brownie mix until marbled. 

5. Bake for about 40 minutes. Cool completely and then refrigerate until chilled. Cut the brownies and enjoy their delicious yumminess!

Mint Chocolate Brownies


Did you enjoy this post? Follow me on PINTEREST, FACEBOOK, TWITTER,
INSTAGRAM and on BLOGLOVIN' to stay updated!

(Parties I link to HERE)

Monday, September 16, 2013

Marble Cheesecake Brownies

Marble Cheesecake Brownies

You know anything with cheesecake AND brownies together is going to be delicious and these bars are no exception! They were so good and my husband ate about half the pan in one sitting. Good thing he's around to eat most of what I bake, I don't like having temptations sitting around all the time!

You definitely won't be disappointed if you make these yummy marble cheesecake brownies! The recipe makes an 8x8 inch pan of brownies, but you could double it and make a 9x13 pan as well. 

Marble Cheesecake Brownies (adapted from Just a Taste)
For the brownies:
  • 8 Tablespoons (1 stick) Butter, melted
  • 1 Cup Sugar
  • 1/4 Cup Unsweetened Cocoa Powder
  • 1/2 teaspoon Vanilla Extract
  • 1/8 teaspoon Salt
  • 1/2 teaspoon White Vinegar
  • 2 Eggs
  • 3/4 Cup Flour
For the cheesecake:
  • 8 ounce package Cream Cheese, softened
  • 3 Tablespoons Sugar
  • 1/2 teaspoon Vanilla Extract
  • 1 Egg
1. Preheat the oven to 350 degrees and lightly grease an 8x8 inch baking pan.

2. In a large bowl, combine the melted butter, sugar, cocoa powder, vanilla and salt. Then add in the vinegar. 

3. Whisk the eggs in a separate bowl and then add to the brownie batter.

4. Fold in the flour until just combined. Pour the batter into the prepared pan leaving out 1/4 cup of batter for the topping.

5. Blend together the cream cheese, sugar, vanilla and egg. 

6. Spread the cream cheese mixture over the brownie batter in the pan and then top that with dollops of the remaining brownie batter. Use a sharp knife to swirl the cream cheese together with the brownie dollops. 

7. Bake for 25-30 minutes and let cool completely before cutting and serving.


Did you enjoy this post? Follow me on PINTEREST, FACEBOOK, TWITTER,
INSTAGRAM and on BLOGLOVIN' to stay updated!

(Parties I link to HERE)

Wednesday, July 31, 2013

15 Amazingly Delicious Dessert Bars

15 Amazingly Delicious Dessert Bars
As you might remember, I'm doing the 21 Day No Junk Food Challenge, so I can't even eat any of these delicious looking bars right now! So I think you all should make some and eat an extra one for me. Don't they all look so yummy!? I don't even know which one I would make first...


 Gooey Lemon Cake Bars @ Shugury Sweets


 Chocolate Chip Pumpkin Brownie @ A Taste of Madness


 Snickerdoodle Bars @ She Turned Her Dreams Into Plans


Blueberry Pie Bars @ Life's Simple Measures


Caramel Apple Cheesecake Bars @ The Girl Who Ate Everything


 Twix Cheesecake Bars @ Annie's Noms


 Delicious M&M Cookie Bars @ She Turned Her Dreams Into Plans


 Dulce de Leche Cookie Bars @ Pizzazzerie


 Smores Bars @ Sugar Cooking


 Triple Chocolate M&M Brownies @ Cozy Country Living


 Mint Chocolate Freezer Brownies @ Confessions of a Cookbook Queen


Red Velvet Cheesecake Brownies @ Just a Taste


Reese's Butterfinger Cheesecake Bars @ Tastes of Lizzy T


 No Bake Reese's Fudge Bars @ Six Sister's Stuff


White Chocolate Blueberry Bars @ This Gal Cooks


Follow me on PINTEREST, FACEBOOK and TWITTER!

(I might be linking to some of these lovely parties)

Tuesday, July 23, 2013

Summertime Pinwheel Icebox Cookies


Summertime Pinwheel Icebox Cookies

I love cookies! I made these delicious cookies last week and they didn't last long around here. I always seem to have problems when I try to make icebox cookies that you roll up and slice. I can never get them as perfect as I want them to be! These turned out okay, I thought they were going to be much worse. At least they still tasted great! 

I was trying to pick two summery colors and decided on orange and purple. You, of course, can pick any two colors you would like. These would be perfect for any holiday, just use holiday colors for them! I love the peppermint taste they have, but if you don't care for that you can also leave the peppermint out.

Summertime Pinwheel Icebox Cookies (adapted from Just a Taste)
  • 3 Cups Flour
  • 1/2 Teaspoon Baking Powder
  • 1/ 2 Teaspoon Salt
  • 1 Cup Unsalted Butter
  • 1 1/3 Cups Sugar
  • 2 Eggs
  • 2 Teaspoons Vanilla Extract
  • 1 Teaspoon Peppermint Extract
  • Food Coloring 
1. In a medium bowl, sift together the flour, baking powder and salt.

2. In a large bowl, beat together the butter and sugar until it is light and fluffy. Add in the eggs plus the vanilla and peppermint extracts.

3. Add in the flour mixture and mix well.

4. Separate the dough into three equal pieces. Add food coloring to two of them to get your desired color. 

5. Shape each piece into a 4x4 inch square, wrap it in plastic wrap and place them in the fridge for 30 minutes.

6. Remove the dough from the fridge and cut each square in half to form two rectangles. Place one half of each color back in the fridge for now. Place one color of dough in between two pieces of wax paper and roll out into a rectangle about 1/8 thick. Do the same with the other two colors.

7. Peel off one side of wax paper and place the three layers of color on top of each other. Roll lightly.

8. Starting at the short end, roll the dough as tightly as possible into a log. Repeat the rolling and stacking process with the other half of the dough you have in the fridge. Wrap both logs in plastic wrap and refrigerate for 1 hour. 

9. Remove the logs and roll them on the counter so they don't develop a flat side. Refrigerate for 4 more hours. 

10. When you are ready to bake them, preheat the oven to 350 degrees. Slice each log into 1/4 inch slices and bake 9 to 11 minutes. The cookies will expand slightly when baking, so place them about 2 inches apart. 

Hopefully yours turned out better than mine! Enjoy your summertime cookies!

Follow me on PINTEREST, FACEBOOK and TWITTER!

(I might be linking to some of these lovely parties)

Tuesday, May 21, 2013

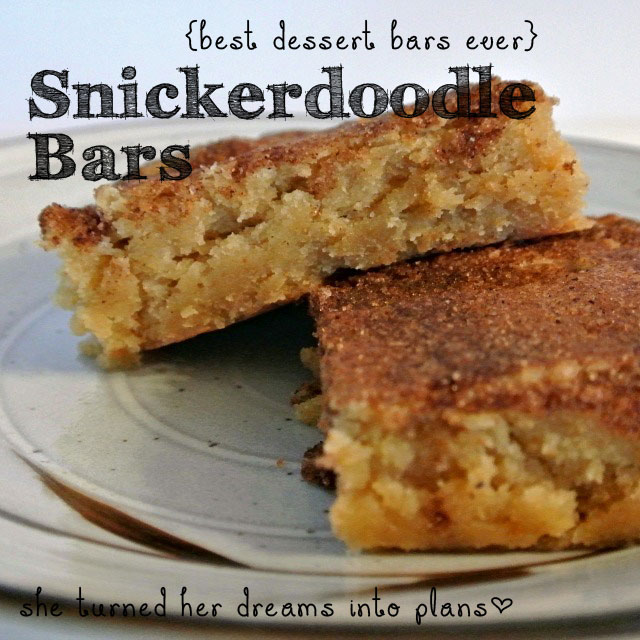
Snickerdoodle Bars are the Best Dessert Bars Ever!

Snickerdoodle Bars, these are the best dessert bars ever!

It's true. These Snickerdoodle bars are now my favorite dessert ever. This is about my third time making them and they are delicious! Super easy to make and they stay soft and chewy even after a few days. You must try them out, especially if you have kids that love Snickerdoodle cookies.

Snickerdoodle Bars (recipe found at My Own Sweet Thyme)

2-2/3 cups all-purpose flour
2 teaspoons baking powder
1 teaspoon salt
2 cups packed brown sugar
1 cup butter, at room temperature
2 eggs, at room temperature
1 tablespoon vanilla
2 tablespoons white sugar
2 teaspoons ground cinnamon

1. Preheat oven to 350 degrees. Lightly grease a 9x13 baking pan.

2. In a medium bowl, whisk together the flour, baking powder and salt. Set aside.

3. In a large bowl, beat together the butter, brown sugar, eggs and vanilla until smooth. Add the flour mixture to the egg mixture and beat until well blended.

4. Spread the batter evenly into the prepared pan.

5. In a small bowl, combine the white sugar and cinnamon. Sprinkle over the batter in the baking pan.

6. Bake for 25-30 minutes or until the surface springs back when gently pressed.

7. Remove from oven and let cool. Eat one or two of them before everyone else finds out they are done. Enjoy!


(Linking to some of these lovely parties and at Show Me the Goods)

ShareThis

Related Posts Plugin for WordPress, Blogger...